
Deploying Django Apps (with PostgreSQL) on Azure App Services — from scratch
This post was originally published on Medium.
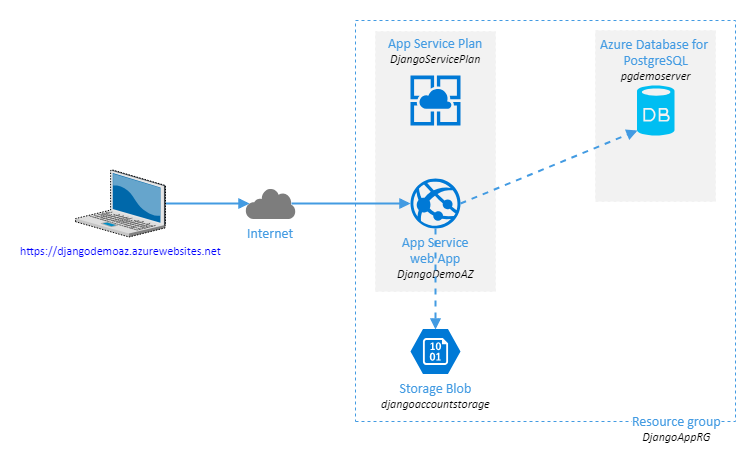
In this tutorial, we will learn how to deploy a Django App using a PostgreSQL DB on Azure App Services.
Technical overview:
Fundations
To perform provisionning of PostgreSQL DB and App Service, we’ll use Azure CLI, which is by far the best and fastest way. I need to provision a Resource Group, an App Service Plan, an App Service and an Azure Database for PostgreSQL. I will use the following names:
- Resource group name: DjangoAppRG
- App Service Plan name: DjangoServicePlan
- App Service name: DjangoDemo
- Azure Database for PostgreSQL name: pgdemoserver
- PostgreSQL Database name: myproject
- PostgreSQL admin-user: myadmin
- PostgreSQL password: ThisIs4P4ssw0rd!=1
PostgreSQL Provisionning
1
2
3
4
5
6
7
8
9
10
11
12
13
14
15
# Create resource group named DjangoAppRG
$ az group create --name DjangoAppRG --location "West Europe"

# Create Azure Database for PostgreSQL server named pgdemoserver
$ az postgres server create --resource-group DjangoAppRG --name pgdemoserver  --location westeurope --admin-user myadmin --admin-password ThisIs4P4ssw0rd!=1 --sku-name B_Gen5_1

# Allow access to Azure services
$ az postgres server firewall-rule create -g DjangoAppRG -s pgdemoserver -n allowall --start-ip-address 0.0.0.0 --end-ip-address 0.0.0.0

# Connect to the DB
$ psql --host=pgdemoserver.postgres.database.azure.com --port=5432 --username=myadmin@pgdemoserver --dbname=postgres

# Create Django database named djangodb
postgres=> CREATE DATABASE myproject;
postgres=> \q
App Service provisionning
The script below creates and configures App Service Plan and App Service resources. We define sensitive informations like connection settings with environment variables because we do not want them to be stored in plain text.
1
2
3
4
5
6
7
8
9
10
11
12
13
14
15
16
17
18
# Create appservice plan named DjangoServicePlan
$ az appservice plan create -g DjangoAppRG -n DjangoServicePlan --is-linux --number-of-workers 1 --sku S1 -l westeurope

# Create App Service named DjangoDemoAZ
$ az webapp create --resource-group DjangoAppRG --plan DjangoServicePlan --name DjangoDemoAZ --runtime "PYTHON|3.7" --deployment-local-git

# (optional) Disable ARR DjangoDemoAZ & force HTTPs
$ az webapp update --name DjangoDemoAZ --resource-group DjangoAppRG --client-affinity-enabled false --https-only true

# (optional) Enable HTTP 2.0, Disable FTP(s) deployment capability and "Always On" mode
$ az webapp config set --name DjangoDemoAZ --resource-group DjangoAppRG  --http20-enabled  true --ftps-state Disabled --always-on false

# Define environment variables
$ az webapp config appsettings set -g DjangoAppRG -n DjangoDemoAZ --settings DATABASE_NAME=myproject
$ az webapp config appsettings set -g DjangoAppRG -n DjangoDemoAZ --settings DATABASE_USER=myadmin@pgdemoserver
$ az webapp config appsettings set -g DjangoAppRG -n DjangoDemoAZ --settings DATABASE_PASSWORD=ThisIs4P4ssw0rd!=1
$ az webapp config appsettings set -g DjangoAppRG -n DjangoDemoAZ --settings DATABASE_HOST=pgdemoserver.postgres.database.azure.com
$ az webapp config appsettings set -g DjangoAppRG -n DjangoDemoAZ --settings DATABASE_PORT=5432
Django part
Start a basic Django project:
1
2
3
4
5
6
7
8
$ mkdir DjangoDemo
$ cd DjangoDemo/
$ pipenv install django
$ pipenv install psycopg2
$ pipenv shell
(DjangoDemo) $ django-admin.app startproject backend .
# Generate requirements.txt (Pipfile isn't supported yet by Azure)
(DjangoDemo) $ pipenv lock --requirements > requirements.txt
Edit backend/settings.py to load connection credentials from environment variables:
1
2
3
4
5
6
7
8
9
10
11
12
13
14
15
16
17
ALLOWED_HOSTS = [
    "*"
]

DATABASES = {
    'default': {
        'ENGINE': 'django.db.backends.postgresql_psycopg2',
        'NAME': os.environ.get('DATABASE_NAME', ''),
        'USER': os.environ.get('DATABASE_USER', ''),
        'PASSWORD': os.environ.get('DATABASE_PASSWORD', ''),
        'HOST': os.environ.get('DATABASE_HOST', ''),
        'PORT': os.environ.get('DATABASE_PORT', ''),
        'OPTIONS': {
            'sslmode': 'require',
        }
    }
}
Create a .env file with the following content:
1
2
3
4
5
DATABASE_NAME=myproject
DATABASE_USER=myadmin@pgdemoserver
DATABASE_PASSWORD=ThisIs4P4ssw0rd!=1
DATABASE_HOST=pgdemoserver.postgres.database.azure.com
DATABASE_PORT=5432
pipenv loads this file and define these variables as environment variables.
Deployment
Perform database migration:
1
2
3
(DjangoDemo) $ exit
$ pipenv shell # to load .env file
(DjangoDemo) python manage.py migrate
django.db.utils.OperationalError: server closed the connection unexpectedly. This probably means the server terminated abnormally before or while processing the request.
If the previous error messages issues, it is required to whitelist the Client IP in Connection security:
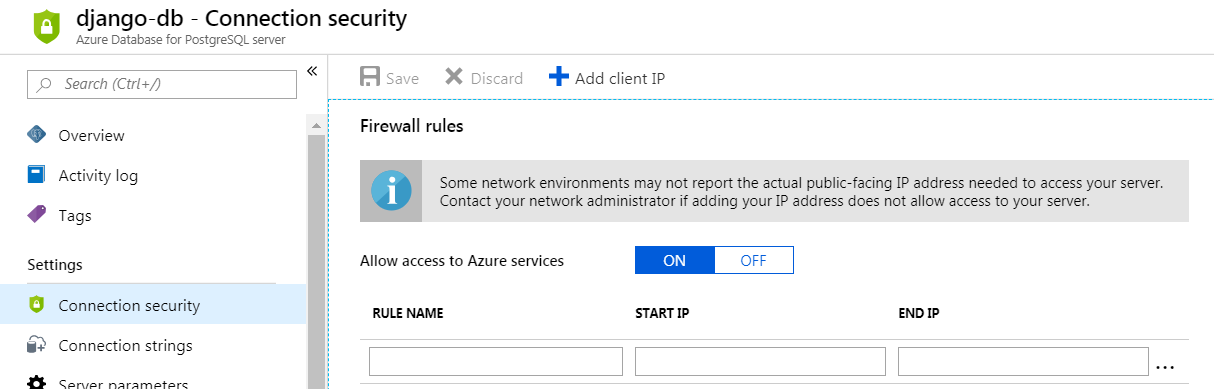
Repeat the migration, it should work.
Finally, deploy django. It is just a git push:
1
2
3
4
5
6
7
$ git init .
$ git add .
$ git commit -am "initial commit"
$ git remote add azure https://davidsntg@djangodemoaz.scm.azurewebsites.net:443/DjangoDemoAZ.git
$ git push azure master
... ...
# Website available here : https://djangodemoaz.azurewebsites.net
Tips: .gitignore can be given by Gitignore if you do not want to push useless stuff.
Conclusions
Deploying Django Apps (with PostgreSQL) using Azure App Services is pretty easy.
App Service has tons of features for everything : scalability, authentication, backups, SSL, performance test, …. Feel free to explore what it is possible to do with.
Regarding storage account component in the first architecture figure, this component can handle static & media assets, which is optimized for this purpose.
The next step could be to set-up a multi-stage continuous deployment pipeline with Django & App Service, are you interested ?
Hope this tutorial was helpful. Feel free to leave me a feedback 😏